Alright, let’s jump right into the conversation. If you’re anything like me, you probably prioritize your privacy, especially when it comes to interactions on the internet. Discord has become a well-liked venue for various types of conversations, including those about gaming or professional matters. But, here’s the catch – not every piece of information or discussion is meant for public eyes. This is where the privacy settings come into play, serving as a contemporary digital hero.
In this piece, I’m serving up straight talk on how to make your Discord server private. No jargon, no fluff, just a plain, effective guide. So, if the thought, “How can I keep uninvited guests out?” ever crossed your mind, stick with me. By the end of this, you’ll turn your Discord server into a cozy, private corner of the internet where only the welcomed can enter. Let’s jump in!
Table of Contents
Understanding Discord Privacy Settings
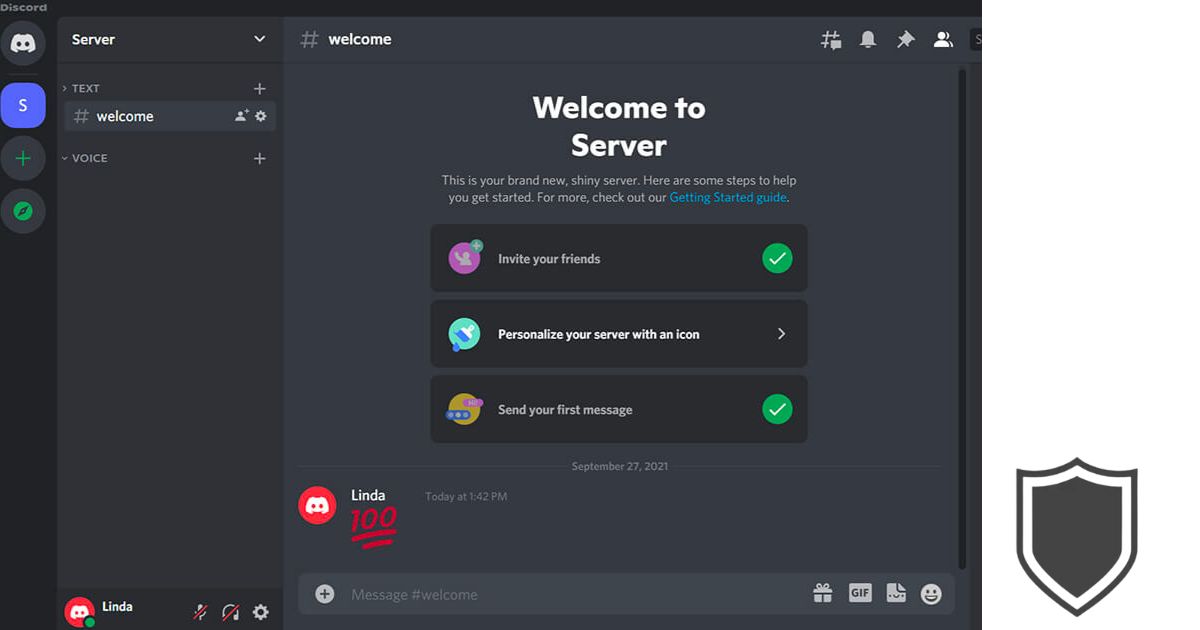
When it comes to Discord, privacy is an important aspect to consider. You want to make sure that your server is secure and private enough to prevent unwanted access by strangers. Discord provides a range of privacy settings that you can use to customize your server and control who can access it.
To begin with, you can choose to make your server public or private. A public server can be joined by anyone, while a private server requires an invitation link or approval from the server owner to join. If you want to make your server private, you can do so by going to Server Settings > Privacy Settings and enabling the “Private Server” option.
Discord also provides role-based permissions that allow you to control what each member can see and do on your server. By default, new members are assigned the @everyone role, which has limited permissions. You can create custom roles with different permissions and assign them to members as needed. For example, you can create a “Moderator” role with the ability to kick or ban members, and assign it to trusted members.
Another important aspect of privacy is the ability to hide channels from members who don’t have the required role. This can be useful if you have sensitive information that you only want to share with a select group of members. To do this, go to the channel settings and enable the “Private Channel” option.
Finally, it’s important to keep in mind that Discord has a range of privacy and safety features built-in, such as two-factor authentication, message scanning for explicit content, and the ability to report and block users. By taking advantage of these features, you can ensure that your server is as secure and private as possible.
Creating Your Discord Server
When creating a Discord server, there are a few things to consider. I’ll guide you through the process of creating a server and setting it up to be private.
Choosing a Server Name
The first step in creating a Discord server is to choose a name for it. The name should be something that reflects the purpose of the server and is easy to remember. To choose a server name, follow these steps:
- Click on the “+” icon on the left-hand side of the Discord app.
- Select “Create Server” from the drop-down menu.
- Choose a server region that is closest to your location.
- Enter a name for your server in the “Server Name” field.
- Click “Create.”
Setting Up Roles
Roles are an important aspect of Discord servers. They allow you to assign different permissions to different users, which helps keep your server organized and secure. To set up roles, follow these steps:
- Click on the server name in the top left corner of the Discord app.
- Select “Server Settings” from the drop-down menu.
- Click on “Roles” in the left-hand menu.
- Click the “+” button to create a new role.
- Enter a name for the role and assign it the appropriate permissions.
- Click “Save Changes” to create the new role.
Once you have created your server and set up roles, you can start inviting people to join your server. Keep in mind that if you want your server to be private, you will need to limit who can join by either inviting people directly or by creating an invite link that can only be accessed by those you trust.
That’s it! With these simple steps, you can create a Discord server and set it up to be private.
Making Your Discord Server Private
When you create a Discord server, it is public by default. However, you can make your server private to keep it hidden from the public. Here are the steps to make your Discord server private:
Adjusting Server Settings
- Open Discord and log in to your account.
- Click on the server name to access the server.
- Click on the server settings icon (gear icon) located next to the server name.
- Click on the “Privacy Settings” option.
- Under “Server Privacy,” select the “Private” option.
Implementing Role Permissions
- After making your server private, you can adjust the role permissions to control who can join the server.
- Click on the server name to access the server.
- Click on the server settings icon (gear icon) located next to the server name.
- Click on the “Roles” option.
- Select the role you want to adjust and click on the “Permissions” option.
- Disable the “Create Instant Invite” permission to prevent users from generating invite links to your server.
- Adjust the other permissions as needed to control what users can do on your server.
Inviting Users to Your Private Server
Inviting users to your private server is a straightforward process. Here’s how you can do it:
- Navigate to your server settings by right-clicking on your server name and selecting “Server Settings”.
- Click on the “Invite People” tab located on the left-hand side of the screen.
- Click on the “Create Invite” button.
- Choose the expiration time for the invite link. You can choose between never, 30 minutes, 6 hours, 1 day, 7 days, or custom.
- Choose the maximum number of uses for the invite link. You can choose between 1, 2, 3, 5, 10, 25, or 100 uses.
- Click on the “Generate a new link” button.
- Copy the invite link and send it to the users you want to invite to your private server.
The invite links can be revoked at any time. If you suspect that someone has shared your invite link with others, you can revoke the link to prevent unauthorized access to your private server.
Additionally, you can customize the permissions for each user that you invite to your server. You can assign roles to users to restrict their access to certain channels or features within your server. This is particularly useful if you want to give certain users more control over your server than others.
Maintaining Privacy and Security
As a server owner, it’s important to ensure that your Discord server is secure and private. Here are a few ways to maintain privacy and security:
Regularly Updating Permissions
Regularly updating permissions is an essential aspect of maintaining privacy and security in your Discord server. You need to ensure that the right people have the right permissions and that no one has access to anything they shouldn’t.
To update permissions, you can create new roles with specific permissions or modify existing roles. You can also revoke permissions from users who no longer need them. It’s important to review your server’s permissions regularly to ensure that everything is up-to-date.
Monitoring Server Activity
Monitoring server activity is another important way to maintain privacy and security in your Discord server. You should regularly check your server’s audit log to see who has been doing what. This can help you identify any suspicious activity and take action if necessary.
You can also set up moderation bots to help you monitor your server. These bots can automatically kick or ban users who break the rules, and they can also alert you to any suspicious activity.
Overall, maintaining privacy and security in your Discord server requires vigilance and regular updates. By regularly updating permissions and monitoring server activity, you can ensure that your server remains safe and secure for all its members.
The Final Word
Making your Discord server private is a great way to ensure that only the people you want to be a part of your community are allowed in. It’s a simple process that can be done in just a few steps, and it’s definitely worth the effort.
By following the steps outlined in this guide, you can easily create a private Discord server that will keep your conversations and community safe and secure. Remember to disable all permissions for @everyone and invite only the people you trust to your server.
Additionally, it’s important to remember that privacy is not the only factor to consider when creating a Discord server. You should also think about the purpose of your server, the rules and guidelines you want to enforce, and the type of community you want to create.
Overall, creating a private Discord server can be a fun and rewarding experience, but it’s important to take the time to do it right. By following the steps outlined in this guide and keeping your community’s needs in mind, you can create a thriving and safe space for you and your friends to enjoy.
How to Make Your Discord Server Private FAQs
How can I ensure that my Discord server is private?
To ensure that your Discord server is private, you need to set up the server with the correct settings. You can follow the steps provided by Discord to set up a private server. Additionally, you can also control access to your server by setting up permissions for each role.
What are the steps to make a Discord server private?
To make your Discord server private, you need to create a server and set it up with the correct settings. You can follow the steps provided by Discord to set up a private server. Additionally, you can also control access to your server by setting up permissions for each role.
Can I make my existing Discord server private?
Yes, you can make your existing Discord server private. You can do this by adjusting the server settings and permissions. Follow the steps provided by Discord to set up a private server. Additionally, you can also control access to your server by setting up permissions for each role.
How do I control access to my Discord server?
You can control access to your Discord server by setting up permissions for each role. You can create different roles and assign specific permissions to each role. This way, you can control who has access to which channels and features on your server.
Is there a way to make certain channels on my Discord server private?
Yes, there is a way to make certain channels on your Discord server private. You can do this by setting up permissions for each channel. You can create different roles and assign specific permissions to each channel. This way, you can control who has access to which channels on your server.
Can I create an invite-only Discord server?
Yes, you can create an invite-only Discord server. You can do this by setting up the server with the correct settings and permissions. You can create a role for users who are allowed to invite others to the server. Additionally, you can also control access to your server by setting up permissions for each role.

- Amazon Email Phishing: How to Identify and Avoid Scams - July 5, 2026
- Malwarebytes vs McAfee: Decoding the Ultimate Antivirus Battle - July 5, 2026
- Best Antivirus for Windows 10: Expert Recommendations for 2023 - July 5, 2026


1 thought on “How to Make Your Discord Server Private: Step-by-Step Guide”